How To Implement SSL Termination With HAProxy on Ubuntu 14.04
This tutorial is part 4 of 4 in the series:
Load Balancing WordPress with HAProxy
Introduction
HAProxy, which stands for High Availability Proxy, is a popular open source software TCP/HTTP Load Balancer and proxying solution which can be run on Linux, Solaris, and FreeBSD. Its most common use is to improve the performance and reliability of a server environment by distributing the workload across multiple servers (e.g. web, application, database). It is used in many high-profile environments, including: GitHub, Imgur, Instagram, and Twitter.In this tutorial, we will go over how to use HAProxy for SSL termination, for traffic encryption, and for load balancing your web servers. We will also show you how to use HAProxy to redirect HTTP traffic to HTTPS.
Native SSL support was implemented in HAProxy 1.5.x, which was released as a stable version in June 2014.
Prerequisites
To complete this tutorial, you must have or obtain the following:- At least one web server, with private networking, listening on HTTP (port 80)
- Root access to an additional VPS on which we will install HAProxy. Instructions to set up root access can be found here (steps 3 and 4): Initial Server Setup with Ubuntu 14.04.
- An SSL certificate and private key pair with a "common name" that matches your domain name or IP address
- Create an StartSSL Certificate (private.key and ssl.crt)
- Create a Self-Signed SSL Certificate on Ubuntu 14.04 (Step 2--apache.key and apache.crt)
Creating a Combined PEM SSL Certificate/Key File
To implement SSL termination with HAProxy, we must ensure that your SSL certificate and key pair is in the proper format, PEM. In most cases, you can simply combine your SSL certificate (.crt or .cer file provided by a certificate authority) and its respective private key (.key file, generated by you). Assuming your certificate file is calledexample.com.crt, and your private key file is called example.com.key, here is an example of how to combine the files:cat example.com.crt example.com.key > example.com.pem
sudo cp example.com.pem /etc/ssl/private/
example.com.pem and copies it to /etc/ssl/private. As always, be sure to secure any copies of your private key file, including the PEM file (which contains the private key).In some cases, you may need to copy your CA root certificate and CA intermediate certificates into your PEM file.
Our Starting Environment
Here is the environment that we are starting with: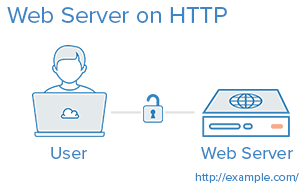
If your environment differs from the example, like if you are already using SSL on the web server or you have a separate database server, you should be able to adapt this tutorial to work with your environment.
If you are unfamiliar with basic load-balancing concepts or terminology, like layer 7 load balancing or backends or ACLs, here is an article that explains the basics: An Introduction to HAProxy and Load Balancing Concepts.
Our Goal
By the end of this tutorial, we want to have an environment that looks like this: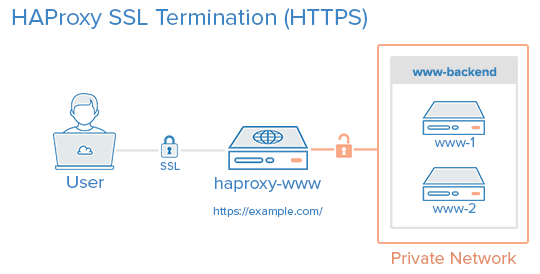
That is, your users will access your website by connecting to your HAProxy server via HTTPS, which will decrypt the SSL session and forward the unencrypted requests to your web servers (i.e. the servers in www-backend) via their private network interfaces on port 80. Your web servers will then send their responses to your HAProxy server, which will encrypt the responses and send them back to the user that made the original request.
You can set up your www-backend with as many web servers as you want, as long as they serve identical content. In other words, you can set this up with a single server then scale it out later by adding as many servers as you want. Remember, as your traffic increases, your HAProxy server may become a performance bottleneck if it does not have enough system resources to handle your user traffic.
Note: This tutorial does not cover how to ensure that your web/application servers serve the same content because that is often application or web server dependent.
Install HAProxy 1.5.x
Create a new VPS with private networking. For this tutorial, we will call it haproxy-www, but you may call it whatever you want.In our haproxy-www VPS, add the dedicated PPA to apt-get:
sudo add-apt-repository ppa:vbernat/haproxy-1.5
sudo apt-get update
sudo apt-get install haproxy
HAProxy Configuration
HAProxy's configuration file is located at/etc/haproxy/haproxy.cfg and is divided into two major sections:- Global: sets process-wide parameters
- Proxies: consists of defaults, listen, frontend, and backend sections
HAProxy Configuration: Global
All of the HAProxy configuration should be done on your HAProxy VPS, haproxy-www.Open haproxy.cfg in an editor:
sudo vi /etc/haproxy/haproxy.cfg
The first thing you will want to do is set maxconn to a reasonable number. This setting affects how many concurrent connections HAProxy will allow, which can affect QoS and prevent your web servers from crashing from trying to serve too many requests. You will need to play around with it to find what works for your environment. Add the following line (with a value you think is reasonable) to the global section of the configuration
maxconn 2048
mode http: option forwardfor
option http-server-close
HAProxy Configuration: Stats
Using HAProxy stats can be useful in determining how HAProxy is handling incoming traffic. If you would like to enable the HAProxy stats page, add the following lines in the defaults section (substitute user and password with secure values): stats enable
stats uri /stats
stats realm Haproxy\ Statistics
stats auth user:password
/stats (e.g. https://example.com/stats).Do not close the config file yet! We will add the proxy configuration next.
HAProxy Configuration: Proxies
Frontend Configuration
The first thing we want to add is a frontend to handle incoming HTTP connections. At the end of the file, let's add a frontend called www-http. Be sure to replacehaproxy_www_public_IP with the public IP of your haproxy-www VPS:frontend www-http
bind haproxy_www_public_IP:80
reqadd X-Forwarded-Proto:\ http
default_backend www-backend
- frontend www-http: specifies a frontend named "www-http"
-
bind haproxy_www_public_IP:80: replace
haproxy_www_public_IPwith haproxy-www's public IP address. This tells HAProxy that this frontend will handle the incoming network traffic on this IP address and port 80 (HTTP) - reqadd X-Forwarded-Proto:\ http: Adds http header to end of end of the HTTP request
- default_backend www-backend: this specifies that any traffic that this frontend receives will be forwarded to www-backend, which we will define in a following step
haproxy_www_public_IP with the public IP of your haproxy-www VPS:frontend www-https
bind haproxy_www_public_IP:443 ssl crt /etc/ssl/private/example.com.pem
reqadd X-Forwarded-Proto:\ https
default_backend www-backend
- frontend www-https: specifies a frontend named "www-https"
-
bind haproxy_www_public_IP:443 ssl crt ...: replace
haproxy_www_public_IPwith haproxy-www's public IP address, andexample.com.pemwith your SSL certificate and key pair in combined pem format. This tells HAProxy that this frontend will handle the incoming network traffic on this IP address and port 443 (HTTPS). - reqadd X-Forwarded-Proto:\ https: Adds https header to end of end of the HTTPS request
- default_backend www-backend: this specifies that any traffic that this frontend receives will be forwarded to www-backend, which we will define in a following step
Backend Configuration
After you are finished configuring the frontends, continue adding your backend by adding the following lines. Be sure to replace the highlighted words with the respective private IP addresses of your web servers:backend www-backend
redirect scheme https if !{ ssl_fc }
server www-1 www_1_private_IP:80 check
server www-2 www_2_private_IP:80 check
- backend www-backend: specifies a backend named www-backend
- redirect scheme https if !{ ssl_fc }: this line redirects HTTP requests to HTTPS, which makes your site HTTPS-only. If you want to allow both HTTP and HTTPS, remove this line
- server www-1 ...: specifies a backend server named www-1, the private IP (which you must substitute) and port that it is listening on, 80. The check option makes the load balancer periodically perform a health check on this server
- server www-2 ...: similar to the previous line. Add additional lines like this, with appropriate names and IP addresses to add more servers to the load balancer
haproxy.cfg. HAProxy is now ready to be started, but let's enable logging first.Enable HAProxy Logging
Enabling logging in HAProxy is very simple. First edit the rsyslog.conf file:sudo vi /etc/rsyslog.conf
$ModLoad imudp
$UDPServerRun 514
$UDPServerAddress 127.0.0.1
sudo service rsyslog restart
/var/log/haproxy.log once HAProxy is started.Start HAProxy
On haproxy-www, start HAProxy to put your configuration changes into effect:sudo service haproxy restart
Things to Check
- If you haven't already, update your nameservers to point your domain to your haproxy-www server's public IP address
- If you want your servers to use only HTTPS, you will want to make sure that your web servers (e.g. www-1, www-2, etc.) are only listening on their private IP addresses on port 80. Otherwise, users will be able to access your web servers via HTTP (unencrypted) on their public IP addresses.
- Visit haproxy-www via HTTPS and ensure that it works
- Visit haproxy-www via HTTP and ensure that it redirects to HTTPS (unless you configured it to allow both HTTP and HTTPS)
Conclusion
Now you have a load balancer solution that handles your SSL connections and can be used to horizontally scale out your server environment. Feel free to combine what you have learned in this guide with other HAProxy guides to improve your environment even further!Tutorial Series
Load Balancing WordPress with HAProxy
Adding a load balancer to your server environment is a great
way to increase reliability and performance. The first tutorial in this
series will introduce you to load balancing concepts and terminology,
followed by two tutorials that will teach you how to use HAProxy to
implement layer 4 or layer 7 load balancing in your own WordPress
environment. The last tutorial covers SSL termination with HAProxy.
You must be logged in to comment. Log In
-
Did you mean '443' instead of 80 in the "Things to Check" section?
" [...] want your servers to use only HTTPS, you will want to make sure that your web servers (e.g. www-1, www-2, etc.) are only listening on their private IP addresses on port 80. Otherwise, users will be able to access your web servers via HTTP (unencrypted) [...]"
It's a small matter. I'm thoroughly reading the articles you are hosting here! I've been hearing a lot of great things about your droplets from several friends; not to mention TechSnap, one of my favorite podcasts. The team I'm working with now is using, I won't say it outright, a competitor... linear poems... an ode... to a line... a line...ode... anyway.
Keep up the great work.
I don't think you will hear this much, but I'm convinced. Run from docker like the plague. I don't have anything against them in particular, but there is going to be some sad suckers, docents in a sense I suppose, when china haz root on their servers; at least, it was easy though, right?
I'm of the opinion that any management / provisioning frameworks that require a running process (Puppet and Chef included) will all introduce the same basic risk; increased attack surface - unnecessarily. SSH based provisioning frameworks are not as popular; but frameworks like Ansible or Python's Fabric are less risky. Nothing is risk free, but they do not increase your system's attack surface nor do they use computational resources beyond those resources used doing their assigned task, as opposed to, waiting / listening for a client to assign them a task.
I'd love to see an article from you guys on Ansible or Fabric... or maybe write one for you? -
@ssullivan: Thank you for the feedback :) Glad to hear you're enjoying our tutorials!
I believe Mitchell meant to emphasize the "private IP addresses" bit. Because SSL is handled by HAProxy, the webservers don't need to bother about it. They accept unencrypted connections from HAProxy over the private network, so they listen on port 80 on the private interface. If they were listening on the public interface instead, anyone would be able to access them directly without passing through HAProxy first and as a result not using HTTPS.
As for Ansible and Fabric, we have some tutorials on them as well: Configuration Management Tutorials & Popular Questions. But you're welcome to write an article (or more) and get paid for it! -
@ssullivan / kamal: Sorry for the late reply. Yes, Kamal is correct. All the SSL is handled by HAProxy in this setup.
-
@Kamal / Michell: Thanks for the great info.
I imagine you would want to have the proper iptables rules in place to limit communications between only the haproxy and www-1 / www-2 boxes as per: how-to-isolate-servers-within-a-private-network-using-iptables
Could someone still listen to the unencrypted port 80 traffic on the private interface using something like wireshark from another node on the shared private network? Or would the iptables rules be enough? If not how can I have SSL all the way to www-1 / www-2?
Thanks again for your great work! -
@dougs:
The most important thing is that your web servers are listening on port 80 on the private interface only (via web server configuration), or the public interface port 80 is blocked. You may also block out other connections, like in the tutorial you linked, but that's not strictly necessary.
If you want to pass SSL through HAProxy to your web servers, one way to do it is to change the HAProxy mode to layer 4tcp(vs. the default layer 7http) and install the identical SSL cert on each of your web server backends (in the web server configuration). With this setup, HAProxy would not look at the contents of the packets and just send them to the backends, which would have to handle the SSL. -
Thanks for the tutorial.
How could we serve mutiple domains with ssl ? -
@arun_shop: can you add more detail to your question?
-
If haproxy had to server different https domain how could we configure?
Lets say i have https//:abc.com and https//:xyz.com to be served by haproxy.
How could we configure the front end for https? can we provide both the certificate for abc.com and xyz.com in one file ?
Thanks! -
Thank you very much! It was very hard to find a good tutorial on this subject.
I tried the configuration you suggested and it worked perfectly. :) -
@arun_shop: I'm not 100% sure, but I think you need two different public IP addresses to use two different SSL certificates in the same HAProxy server. Because the
ssl certparameter is part of thebindparameter, which binds to an IP address. I would guess you need two different frontends, which bind to separate IP addresses.
If your domains are subdomains (e.g. xyz.abc.com and abc.com), you use a wildcard SSL cert, you can redirect the traffic to the proper subdomains using ACLs.
Without SSL, you can definitely server two different hosts with the same frontend, using ACLs. Something like this would do that:
frontend www-https bind haproxy_www_public_IP:80 acl is_abc hdr_end(host) -i abc.com acl is_xyz hdr_end(host) -i xyz.com use_backend abc-backend if is_abc use_backend xyz-backend if is_xyz default_backend abc-backend backend abc-backend server abc-1 abc_1_private_IP:80 check server abc-2 abc_2_private_IP:80 check backend xyz-backend server xyz-1 xyz_1_private_IP:80 check server xyz-2 xyz_2_private_IP:80 check -
Looking to do some testing with EMC's Syncplicity. Their storage compute nodes connect to Isilon on the backend (I'm using 2) and trying to load balance them with HAProxy. The requirement from their cloud side is to terminate SSL on the load balancer and then forward to the compute nodes on port 9000. Can I terminate on haproxy and load balance tcp connections on the backend? I'm attempting to use haproxy 1.5
Here's the config so far:
checking the config, I'm getting errors on the ssl command in the bind statement:
I want to terminate ssl on load balancer.
Any help would be greatly appreciated.frontend syncplb bind 1.1.1.1:443 accept-proxy ssl crt /etc/ssl/certs/sslcerthere.pem mode tcp option httpclose # option forwardfor <----I commented out thinking it was forwarding https to the backend log global option tcplog # reqadd X-Forwarded-Proto:\ https <----commented out. default_backend syncp-storage backend syncp-storage balance roundrobin mode tcp server isilon143 x.x.x.x:9000 check server isilon144 x.x.x.x:9000 check
-James-
I'm getting errors on the ssl command in the bind statement:
Can you post the exact errors that you are getting?
-
-
Hey! Thanks for your tutorial :)
I have a similar set up, meaning HAproxy in front of a single wordpress instance. The difference is that I'm using apache instead of nginx. Anyway, I have some troubles making wordpress working well with https. It's maybe outside the scope of this article, but this is the only serious article I found about my problem.
So after adding the following towp-config.php(from: [http://codex.wordpress.org/AdministrationOverSSL](wordpress.org documentation):
define('FORCE_SSL_ADMIN', true);

if ($_SERVER['HTTP_X_FORWARDED_PROTO'] == 'https')

       $_SERVER['HTTPS']='on';
I don't manage to log in... I get a miserableYou do not have sufficient permissions to access this page.. I'm trying to debug, but I have to admit, I get some troubles doing so... I suspect the cookie getting lost somewhere..
If you have any clue, I'd be really greatful!
Thanks a lot for your work!
Pierre-
Hey Pierre, I'm glad you liked the tutorial.
Keep in mind that the SSL/TLS is being terminated at the HAProxy level, so the communication between HAProxy and Apache/WordPress is unencrypted. As such, you shouldn't use SSL on your WordPress server. Instead, make sure that your Apache/WP server is only communicating with HAProxy via a private network. -
Thanks for the quick reply.
But well, the thing is that internally, wordpress thinks it is on http. So it ends up writing in the html to get the css over http for instance.
So I have 3 options and none are good..
1. Have no specific on wordpress, and the css doesn't load
2. Add the specific wp-config.php code, and get the ugly warning
3. Add an aweful plugin that does more or less the job..
I'm sad ;) I'll try to post the question on some wordpress stack exchange, can have better luck there ;) If you have a better idea?
Thanks again!
-
15 Comments